")

Een schuifdeursysteem zelf maken: stap voor stap
Met dit stappenplan kun je zelf aan de slag met het plaatsen van een schuifdeursysteem. We laten stap voor stap zien hoe het in elkaar zet. Kom je er toch niet uit? Neem dan gerust contact met ons op. Succes!
Stap 1: wat zijn je wensen?
Allereerst is het goed om te bedenken wat je wensen zijn voor het schuifdeursysteem dat je zelf gaat installeren. In welke ruimte moet het doe-het-zelf schuifdeursysteem bijvoorbeeld komen? Wil je het schuifdeursysteem tegen de muur monteren, in de muur, tegen het plafond of misschien zelfs wel in het plafond? Wordt het een systeem voor glas of wellicht voor hout? Schrijf dit voor je zelf op en maak een schets van de situatie. We maken onderscheid tussen twee hoofdcategorieën. Dit zijn systemen die in de wand geplaatst worden (inbouwsystemen) en losse railsystemen.
Twee hoofdcategorieën
Schuifdeursystemen kunnen worden onderverdeeld in twee hoofdcategorieën. Dit zijn enerzijds systemen die in de wand geplaatst worden (inbouwsystemen), en anderzijds losse railsystemen. We lichten beide systemen uit:
Inbouwsystemen
De inbouwsystemen bestaan uit zelfdragende cassettes die in een muur geplaatst worden. Deze systemen zijn makkelijk te plaatsen in metalstud wanden met gipsplaat afwerking, maar zijn eventueel ook beschikbaar met een gaasnet zodat het systeem meteen mee gepleisterd kan worden met de rest van de stenen muur.
We hebben hiervoor systemen met een kant-en-klare cassette, maar ook doe-het-zelf schuifdeursystemen. De systemen met een kant-en-klare cassette zijn bijna meteen klaar voor installatie. De doe-het-zelf schuifdeursystemen moeten nog even in elkaar geklikt worden. Door het snap-fit systeem is dit niet moeilijk en is het doe-het-zelf schuifdeursysteem in ongeveer 30 minuten klaar om te monteren.
Losse railsystemen
Losse railsystemen zijn misschien iets makkelijker te plaatsen voor de beginnende klusser. Deze kunnen zelf op maat gezaagd worden, zodat je er zeker van bent dat je railsysteem voldoet aan jouw eisen. Losse railsystemen kunnen aan het plafond, aan de wand of in een verlaagd plafond worden gemonteerd. In de basis bestaat een los railsysteem uit de volgende onderdelen:
- Een rail
- Ophangset (1 ophangset per schuifdeur)
Stap 2: Je boodschappenlijstje samenstellen
Vervolgens is het tijd om een boodschappenlijstje samen te stellen. Het is verstandig om eerst je schuifdeursysteem uit te kiezen en vanuit daar de rest van je benodigdheden bij elkaar te zoeken.
Wanneer je zelf een schuifdeursysteem wilt plaatsen, heb je het volgende nodig:
- Inbouwcassette / Losse rail
- Ophangset (deze is bij inbouwsystemen altijd inbegrepen. Bij de losse railsystemen is dit niet vanzelfsprekend, dus bekijk welke ophanging het best bij jouw situatie past)
- Eventueel een apart softclose systeem (zit soms ook bij de ophangset inbegrepen)
- Deurpaneel
- Schuifdeurgrepen/schuifdeurslot
- Eventueel een deurpost pakket
- Eventeel koplatten (afwerklatten die rond de deuropening komen)
Stap 3: Je eigen schuifdeurpaneel maken
Een schuifdeur kan je natuurlijk kopen, maar ze zijn ook goed zelf te maken! Let natuurlijk wel altijd goed op welke specificaties er nodig zijn voor het schuifdeursysteem waarin je de deur wil plaatsen. Let hierbij vooral goed op de minimale en maximale dikte van het deurpaneel. Je kan zelf een deur maken door bijvoorbeeld een dikkere mdf plaat of een multiplex deurplaat op maat te zagen en deze te voorzien van het juiste freeswerk. Deze kan daarna geverfd of behangen worden, zodat het deurbeslag gemonteerd kan worden.
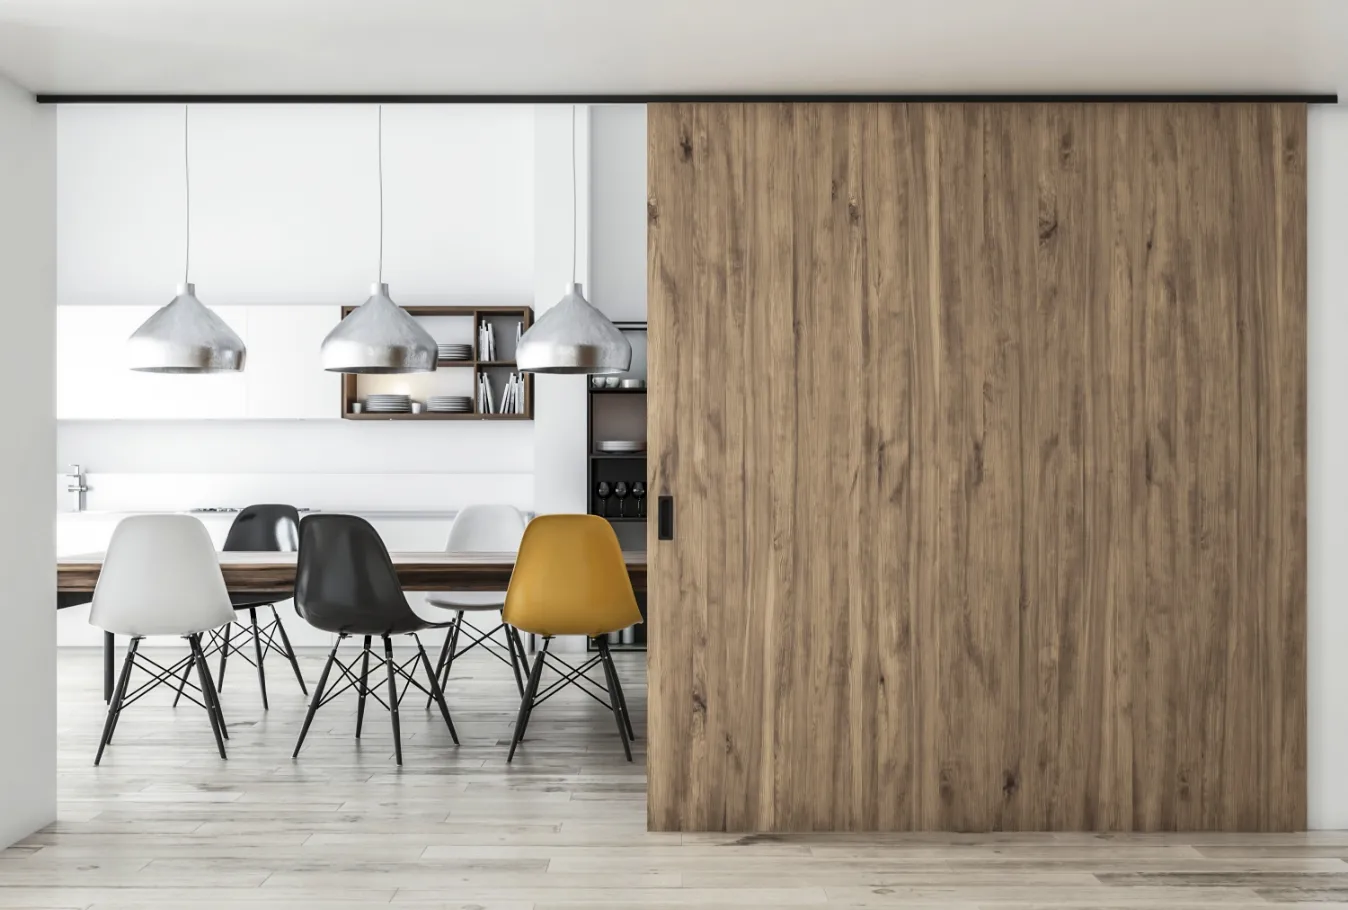
Zelf een barndoor maken
Als je een visueel een wat interessanter deur wil hebben, dan kan je ook zelf een barndoor proberen te maken. Hieronder vind je een tutorial voor een deur van 90x210 cm. In onze tutorial wordt de uiteindelijke deur 90x210, maar als je de maten van de planken aanpast, dan kan je een deur maken die geschikt is voor een andere deurmaat.
Benodigdheden:
Voor het maken van een barndoor heb je het volgende nodig:
- Schuurmachine/ schuurpapier
- Boormachine
- Rolmaat
- Zaag
- Zaagmal
- Geodriehoek
- Waterpas
- Lijmklemmen
- Houtlijm
- Houtvuller
- Beits
- Ammoniak
- Schuifdeursysteem
- Schuifdeurgreep/schuifdeurkommen
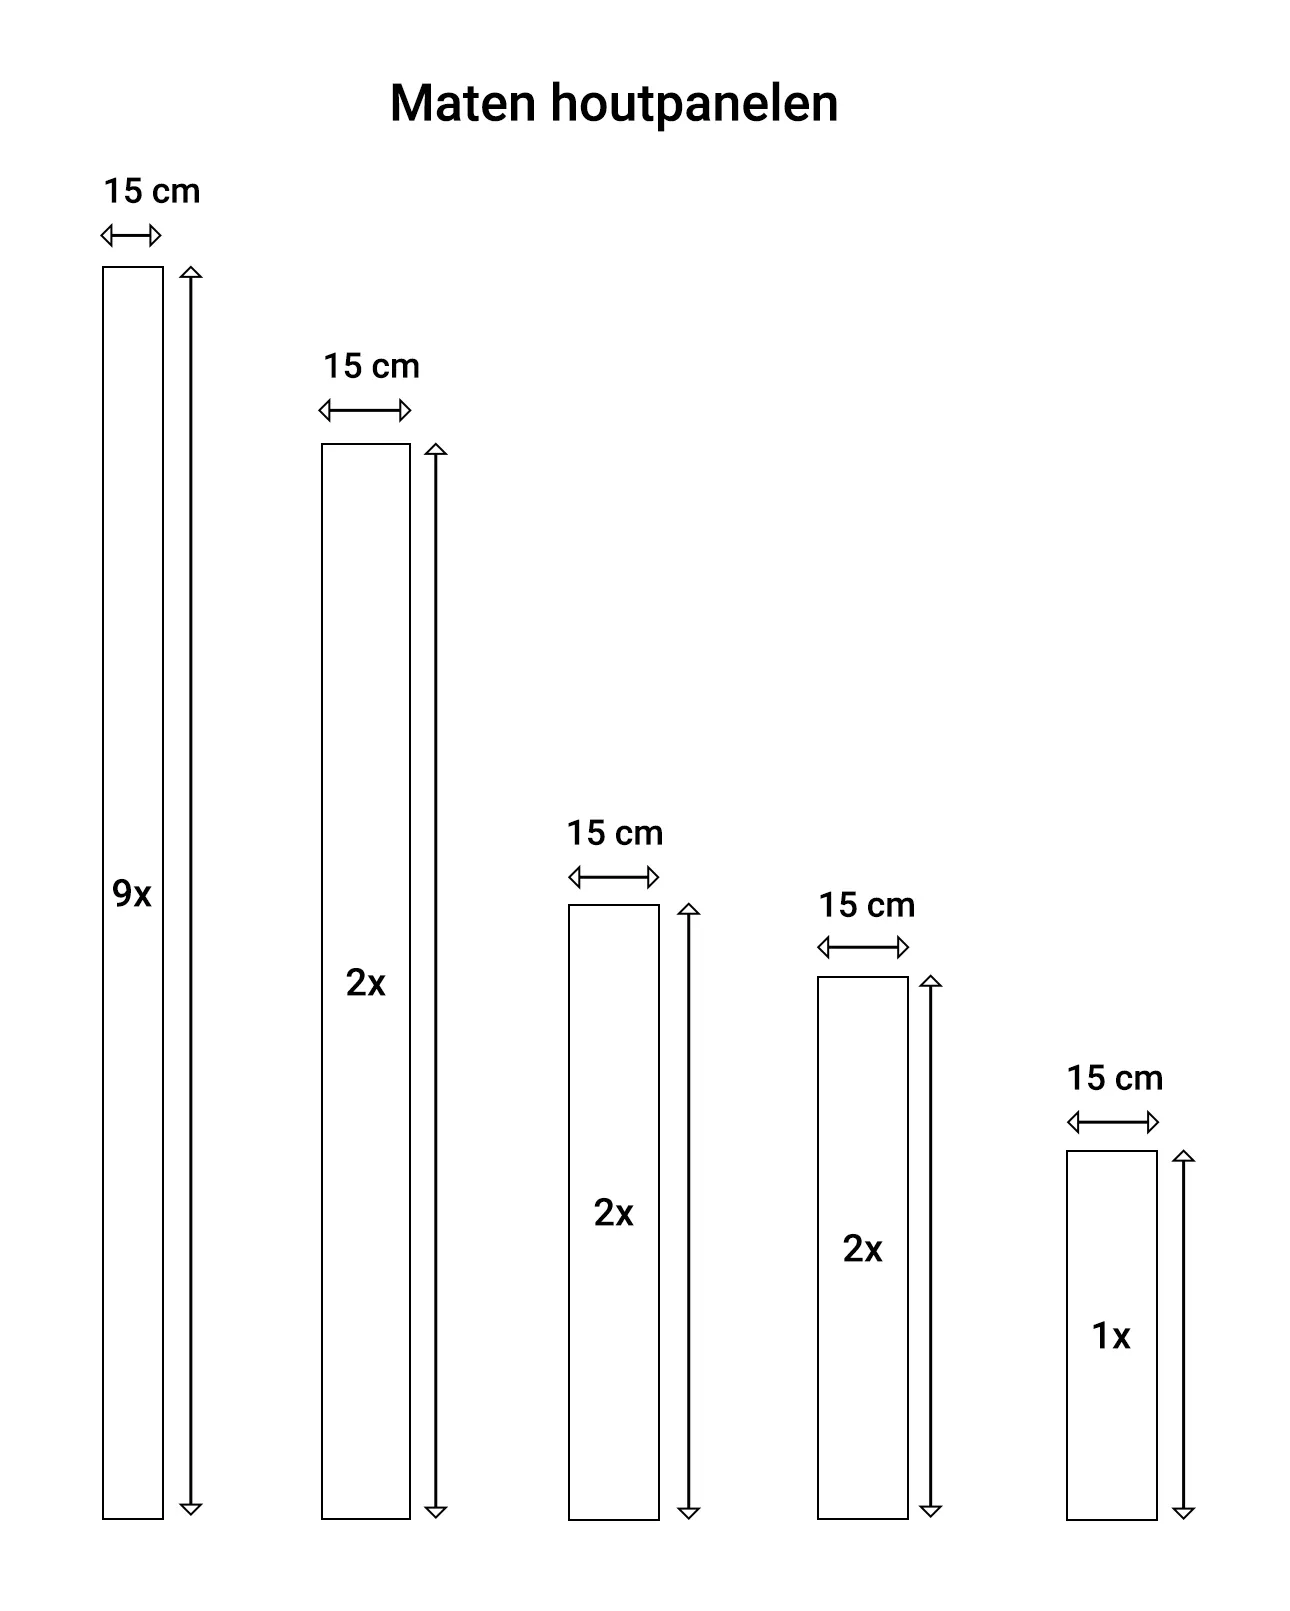
- 9 planken van 10 x 210 cm
- 2 planken van 15 x 180 cm
- 2 planken van 15 x 90 cm
- 1 plank van 15 x 60 cm
- 2 planken van 15 x 102 cm
Let op: hout werkt
Let op! Hout werkt. Houd bij het maken van een schuifdeur-van-hout rekening met de vochtigheidsgraad. De vochtigheidsgraad is in de bouwmarkt waarschijnlijk anders dan bij jou thuis. Het formaat van de planken kan thuis hierdoor iets anders uitvallen. Hier kan je op inspelen door het hout eerst een tijd in huis neer te leggen voordat je het gaat bewerken, zodat het kan acclimatiseren. Gebruik overigens altijd hout dat niet geïmpregneerd is. Douglas hout is bijvoorbeeld zeer geschikt voor het maken van een deurpaneel.
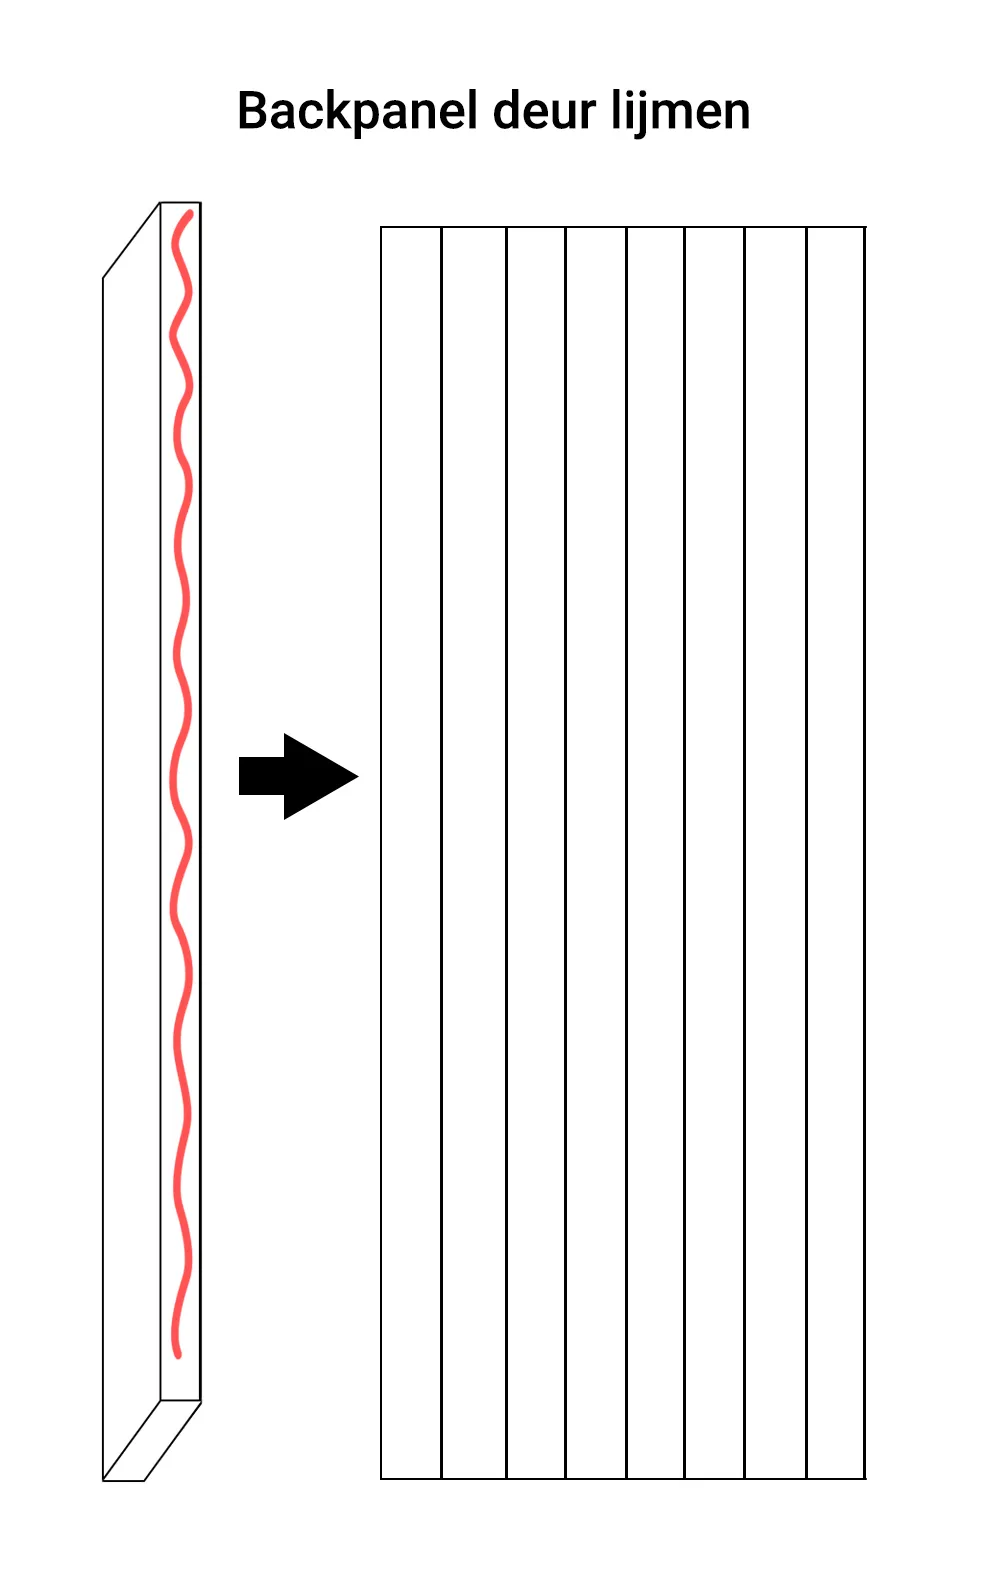
Lijmen van de backpanel:
Je begint met de backpanel van de schuifdeur, namelijk de 9 planken van 10 x 210 cm, via de zijkanten aan elkaar te lijmen. Je gebruikt vervolgens de lijmklemmen om de houtstukken stevig tegen elkaar aan te houden terwijl de lijm uithardt. Na ongeveer een uur is de lijm uitgehard, maar langer wachten is natuurlijk altijd raadzaam!
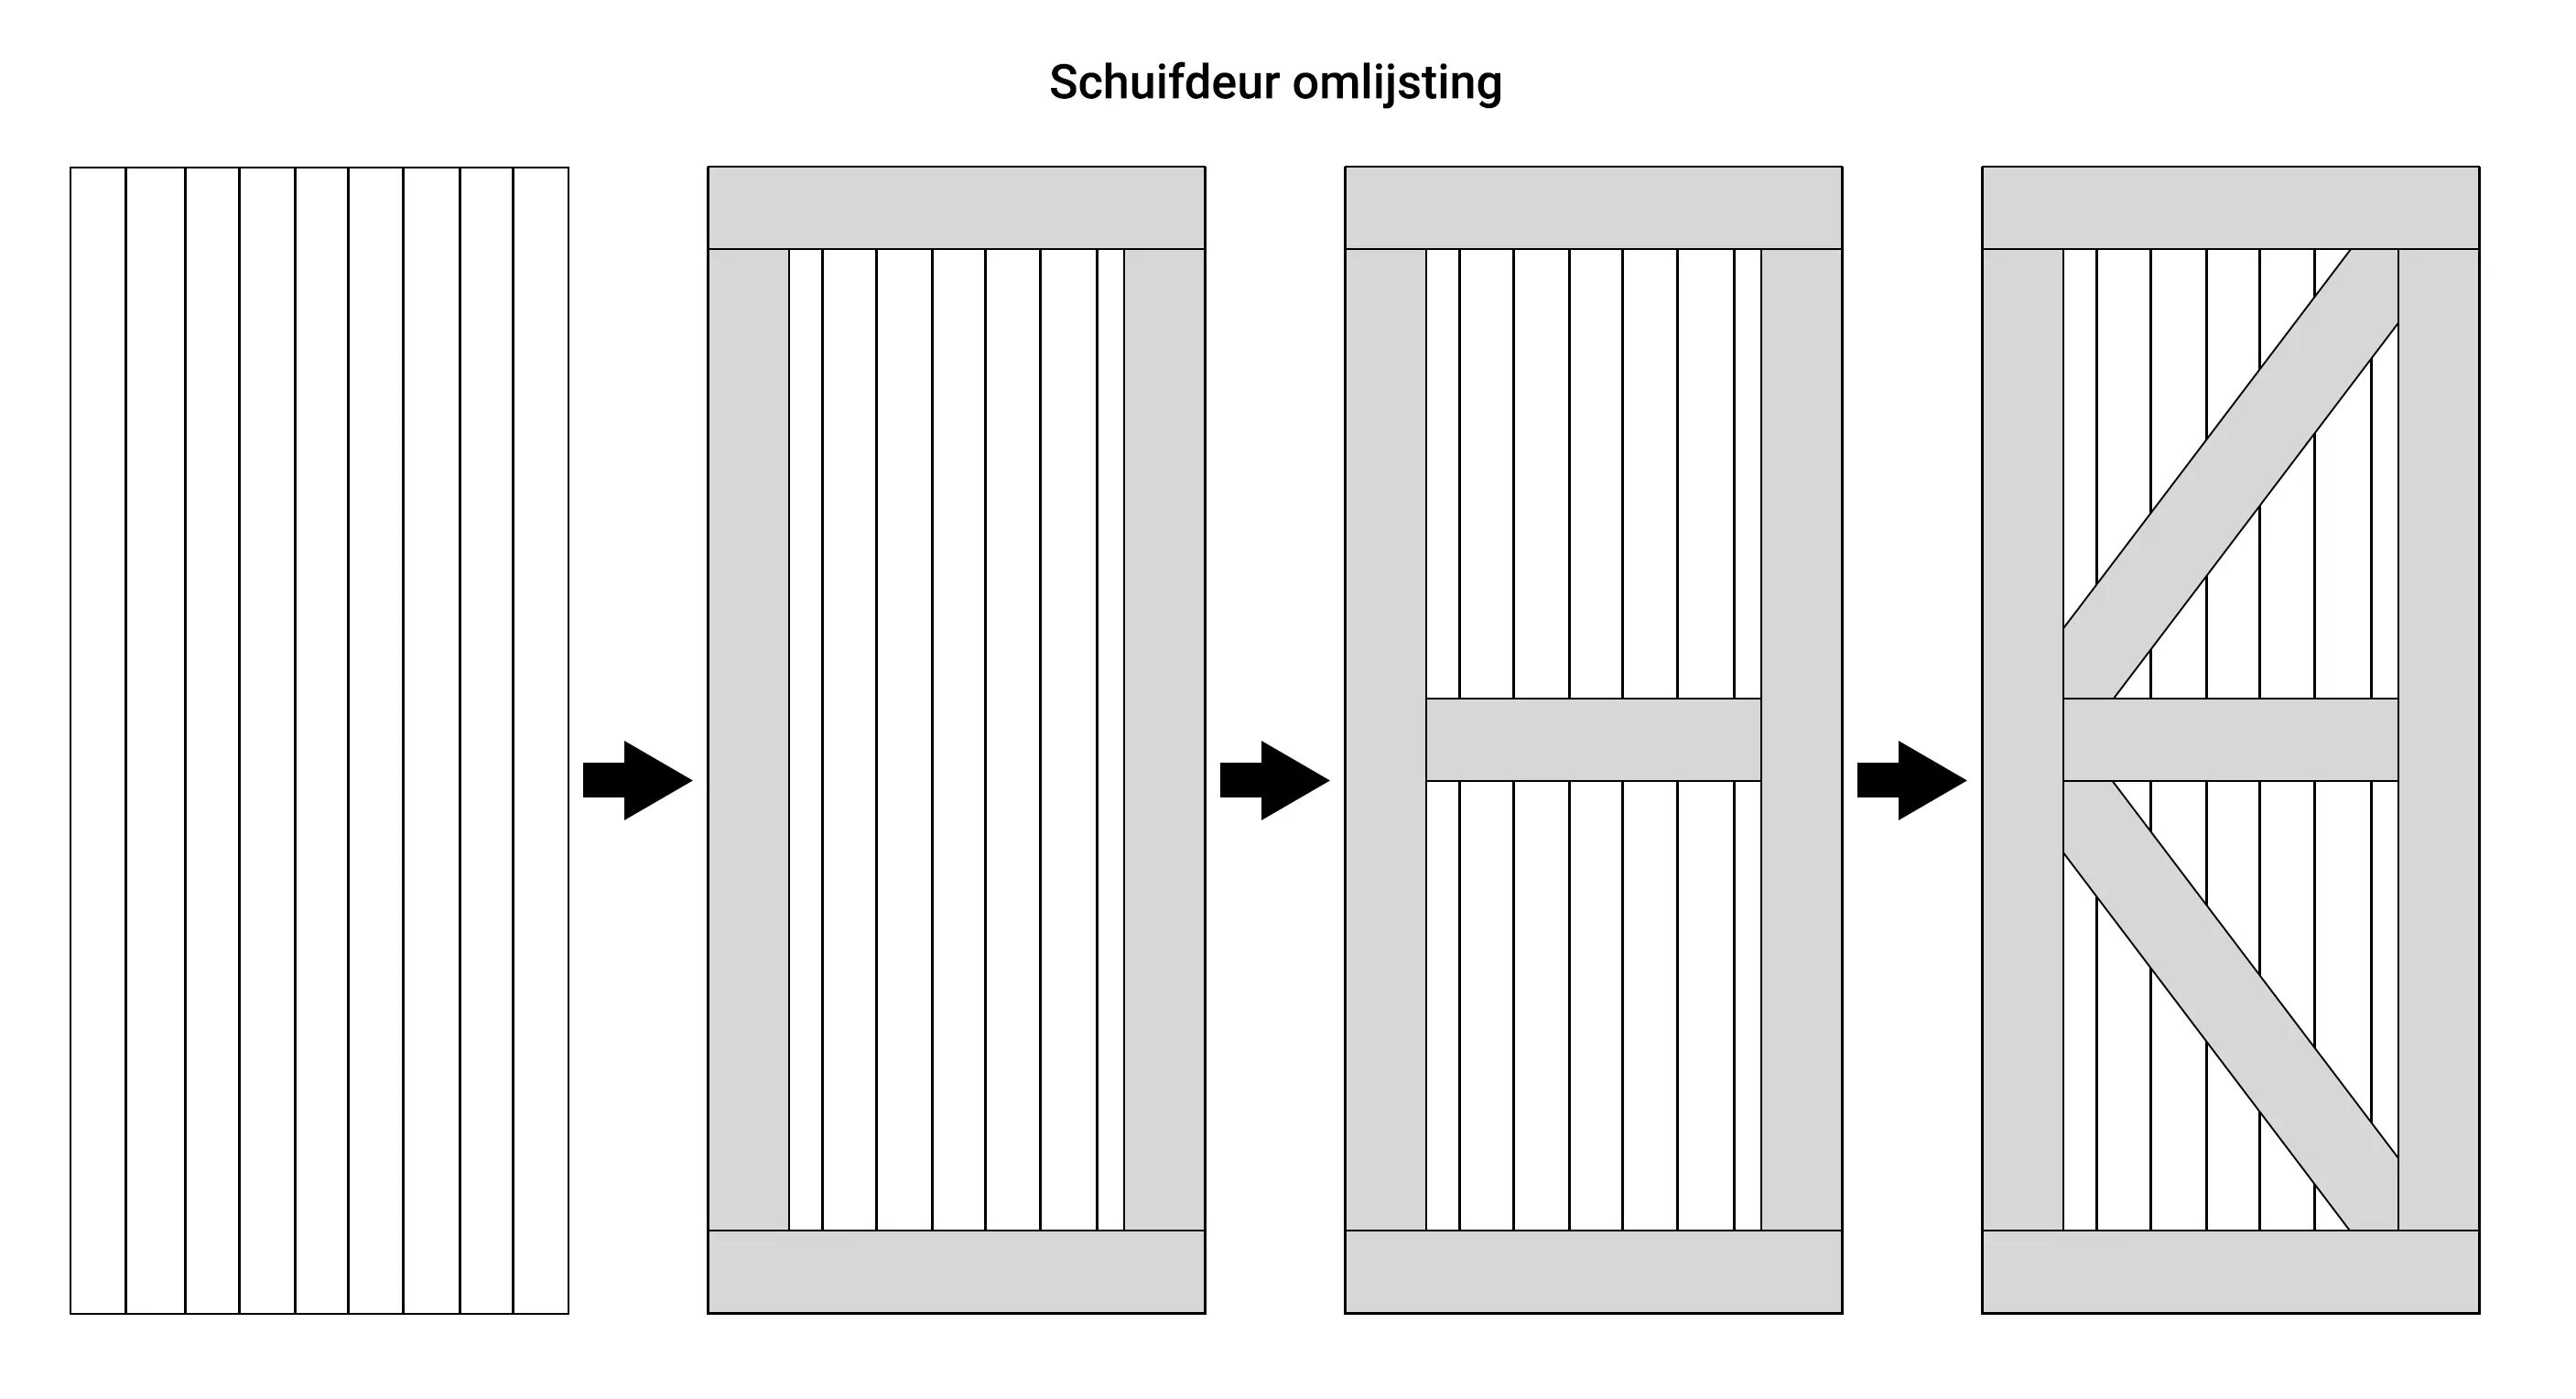
Omlijsting maken:
Als de backpanel af is gaan we beginnen met de omlijsting. Begin met de buitenste planken als eerst te plakken. Zitten die vast? Dan kan je de middenplank van 60cm er ook op plakken.
Passende hoeken:
De diagonale planken moeten passende hoeken krijgen voordat hij diagonaal tussen de omlijsting past. Teken de hoek af met een geodriehoek en gebruik eventueel een zaagmal om de juiste hoek te zagen. Zijn er kiertjes? Met houtvuller kan je deze gemakkelijk dichten. Wacht tot alles goed droog en uitgehard is.
Deur voorbereiden:
Vervolgens moet de deur voorbereid worden voor het schuifdeursysteem. Dit betekent in ieder geval vrijwel altijd dat er aan de onderkant van het deurpaneel een groef gefreesd wordt, zodat de vloergeleider van het schuifdeursysteem de deur stabiel houdt (dit voorkomt dat het deurpaneel gaat wapperen).
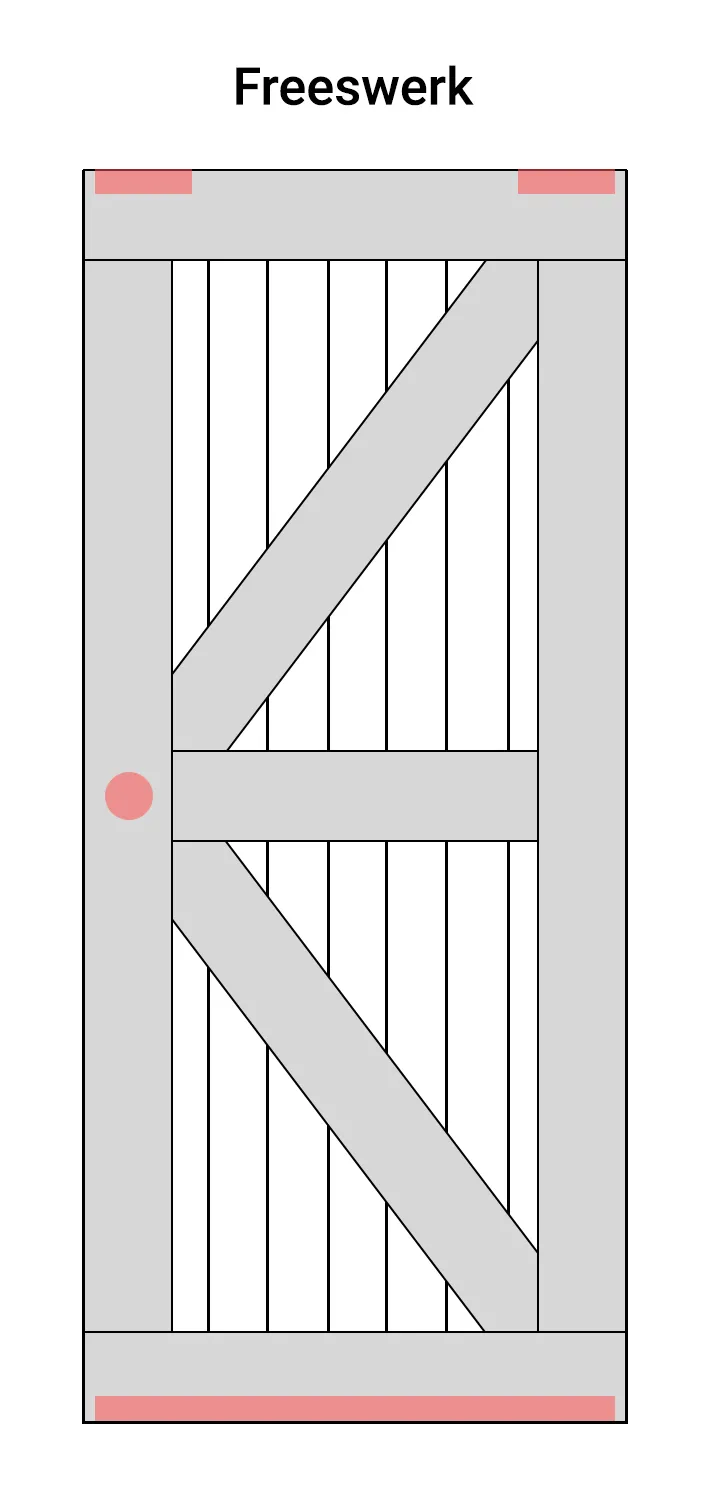
Freeswerk:
In veel gevallen moet er voor de ophangset boven in het deurpaneel ook gefreesd worden, zodat er minimale ruimte is tussen de deurpaneel en de rail. Dit geeft een mooi minimalistisch effect. Check voor de maten van het freeswerk altijd de instructies van het schuifdeursysteem.
Als laatste moet er vaak ook gefreesd worden voor de schuifdeurgrepen. Dit is ofwel omdat de deurgreep in de deur moet komen, zodat de deur langs of in de muur kan glijden. Ook kan het zijn dat er een slotkast in gefreesd moet worden (voor bijvoorbeeld een toiletdeur).
Schuifdeurgrepen monteren:
Zodra je het freeswerk af hebt, kunnen de schuifdeurgrepen gemonteerd worden en is je deurpaneel klaar voor montage in het doe-het-zelf schuifdeursysteem.
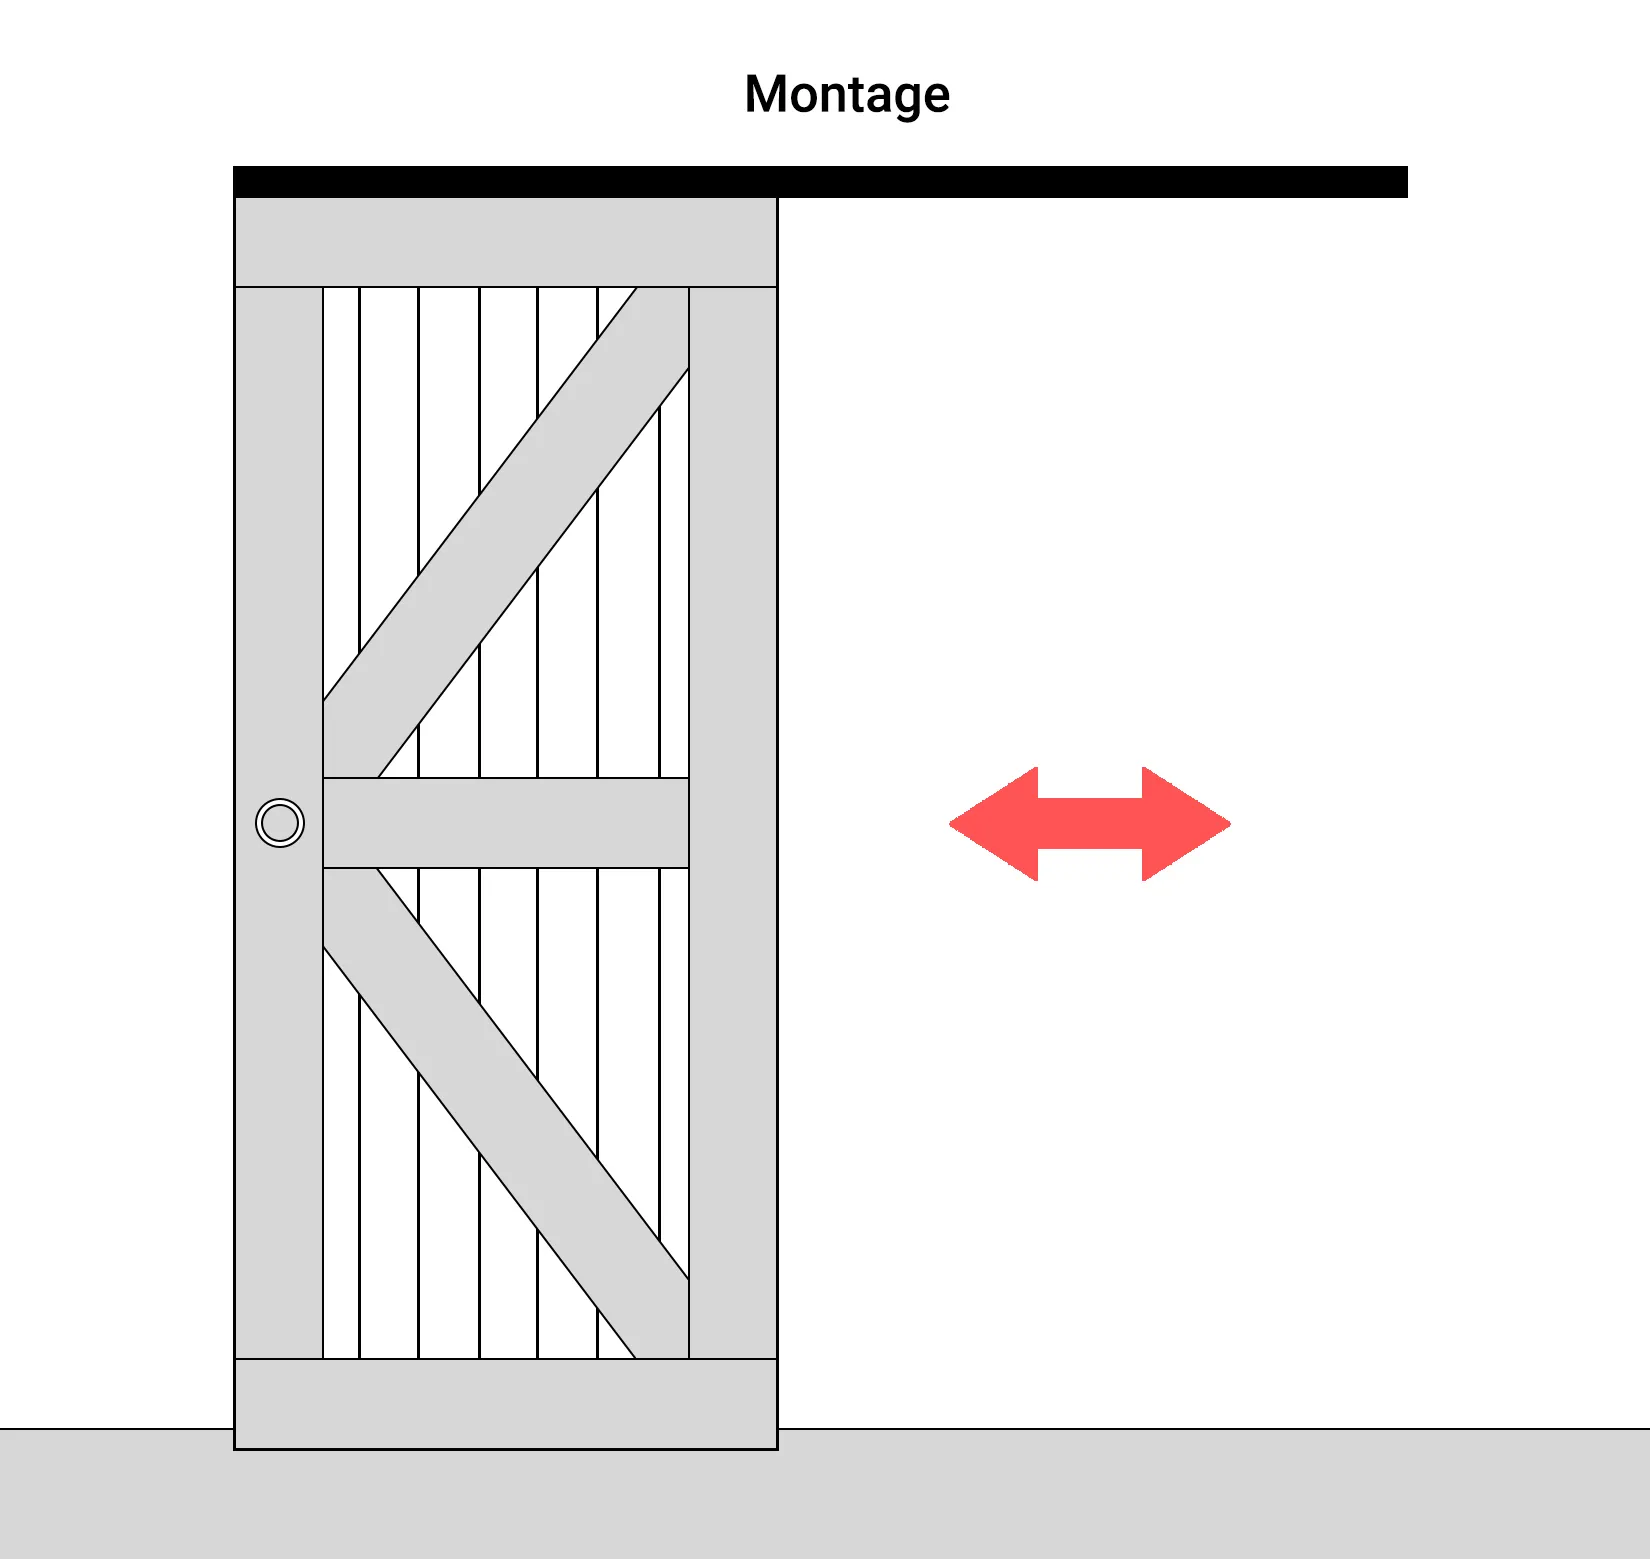
Daadwerkelijke systeem maken:
Als je alle bovenstaande stappen hebt doorlopen, dan wordt het tijd om het schuifdeursysteem zelf te maken. Volg hiervoor de instructies van het gekozen schuifdeursysteem.
Meer weten over een doe-het-zelf schuifdeursysteem?
Bekijk de verschillende doe het zelf kits, plaats een bestelling in de webshop en ga zelf aan de slag! Heb je vragen tijdens de montage? Wij hebben vele instructievideo’s staan op onze Youtube kanaal. Nog steeds niet helder? Wij zijn beschikbaar voor je vragen. Stuur ze naar info@bestfix.nl of bel ons op +31 (0)570 768 737.
Heb jij zelf een schuifdeursysteem gemaakt? Dit vinden wij ontzettend leuk om te zien! Graag zetten wij jouw project in het zonnetje op onze social media kanalen. Stuur de foto’s en beschrijving van je project naar info@bestfix.nl.


